GerbMerge -- The Layout File
Andrew Sterian
Padnos College of Engineering and Computing
Grand Valley State University
| Top-Level | The Configuration File | The Layout File | Automatic Placement |
The layout file tells GerbMerge how to replicate and/or arrange the jobs that you specified in the configuration file. The layout file must be specified when using manual relative placement. See the Automatic Placement page for an alternative to using the layout file approach.
The layout file is a plain text file that can be created with any text editor.
Have a look at the sample layout files layout1.def and layout2.def for a quick overview of this file.
The panel layout is specified in terms of cells. Each cell is part of either a row or column of cells. Each row or column can itself be a part of a column or row, respectively. In this way, a large variety of layouts can be specified. Unfortunately, this scheme is fairly easy to implement in code, but it does not allow for arbitrary placement of jobs.
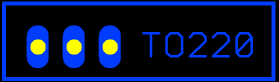
At the top level, you specify the layout of the final panel by specifying the contents of each row, from left to right. Let's begin with an example. The input job, named example is as follows:
  Row {
    example        # Jobs are listed in a row from left to right
    example
    example
  }
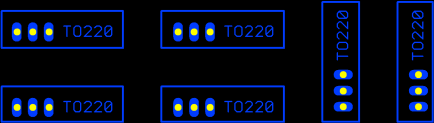
The above layout file leads to the following panel:

The Row { .... } construct indicates a single row of the layout. While you can add spaces and comments as you please, the word Row and its associated open-bracket must appear on one line, each job name on a separate line, and the closing bracket on its own line. Thus, the following is illegal:
Row { example example example } # Illegal!
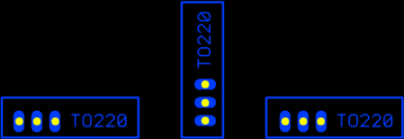
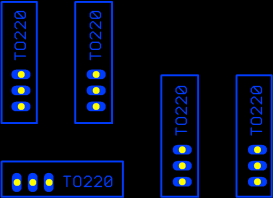
The word Rotate following a job indicates that the given instance of the job is to be rotated by 90 degrees at its current position. For example:
  Row {
    example
    example Rotate
    example
  }
The above layout file leads to the following panel:
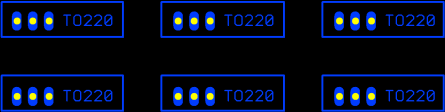
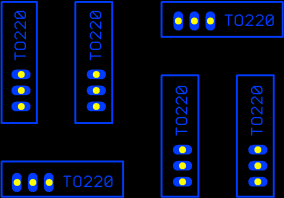
Rows stack vertically beginning at the bottom of the panel and moving up. For example:
  Row {
    example
    example
    example
  }
  Row {
    example
    example
    example
  }
The above layout file leads to the following panel:
Suppose now that we want the two jobs on the right to be rotated so the final panel has a smaller width, but larger height. We can try the following:
  Row {
    example
    example
    example Rotate
  }
  Row {
    example
    example
    example Rotate
  }
The above layout file leads to the following panel:
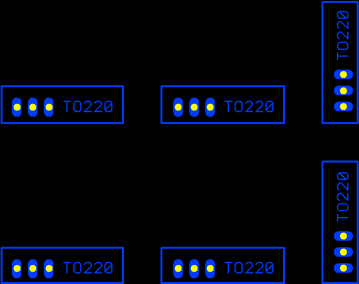
This layout is quite wasteful and not quite what we intended. The problem is that GerbMerge stacks rows on top of each other based upon the highest job within a row. The height of the first (bottom-most) row, then, is the height of the rotated job.
What we really want is to think of our layout in terms of columns (in this case). The first column should be two jobs stacked on top of each other. The second column should be the same. While the third column should be two jobs side by side. We can accomplish this effect by placing columns within a single row. Within a column, jobs are listed in stacking order from bottom to top. For example:
  Row {
    Col {
      example
      example
    }
    Col {
      example
      example
    }
    example Rotate
    example Rotate
  }
The above layout file leads to the following panel:
Study that layout file carefully. The panel has only a single row with 4 elements. The first element is a column with two jobs. The second element (immediately to the right of the first element) is also a column with two jobs. The third element is a rotated job. The fourth and right-most element is a rotated job.
In summary, a row is a list of cells that are laid out from left to right. A cell may be a simple job, or it may be a column of jobs. The column is treated as a single row cell.
Now, let's get fancy and embed a row within a column, like this:
  Row {
    Col {
      example
      Row {              # This row sits above a job, in a column.
        example Rotate   # These are laid out left to right in the
        example Rotate   # middle of a column.
      }
    }
    example Rotate       # These continue left to right in the main row
    example Rotate
  }
The above layout file leads to the following panel:
In words, the job consists of a single row. The first cell in the row is a column. The first cell in the column is a job. Above this cell is another row, which has two cells (rotated jobs) laid out left-to-right.
Keep re-reading the above until it makes sense!
Here's a quiz: how can you modify the layout file so that a non-rotated job is added in the blank space at the top-right of the above panel? Think before proceeding.
To add a job on top of the two rotated jobs at the right of the panel, we must convert those two jobs into a column, like this:
  Row {
    Col {
      example
      Row {              # This row sits above a job, in a column.
        example Rotate   # These are laid out left to right in the
        example Rotate   # middle of a column.
      }
    }
    Col {
      Row {
        example Rotate
        example Rotate
      }
      example            # This job sits on top of the two rotated jobs
    }
  }
The above layout file leads to the following panel:
Once you get the hang of thinking in terms of recursive rows and columns, the process is not all that difficult. There is one important rule to remember, however:
Make sure you have a look at the sample layout files layout1.def and layout2.def for more examples.
For rotating jobs, most users will simply want to rotate jobs by 90 degrees (counterclockwise). This is achieved using the Rotate keyword as described above. It is also possible to rotate jobs by 180 and 270 degrees for special applications, for example, when panelized jobs are not completely separate but need to interact with each other.
The full list of rotation keywords recognized in the layout file is as follows: